
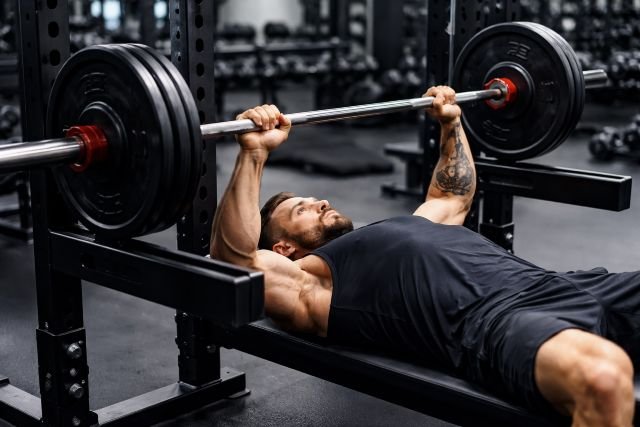
If your bench press stalls a few inches off the chest or dies right before lockout, the pin press is one of the fastest ways to build “raw” pressing power exactly where you’re weakest. Unlike a regular bench press, the bar starts on safety pins inside a rack, which removes momentum and the stretch reflex. That dead-stop start forces your chest, shoulders, and triceps to produce force immediately — no bounce, no shortcuts.
- What is a pin press?
- Why the pin press builds serious chest and triceps power
- Pin press vs. bench press: what carries over
- How to do a pin press with perfect form
- Best pin heights for chest vs triceps emphasis
- Pin press workout programming that actually works
- Common pin press mistakes
- Pin press variations to keep progress moving
- FAQ: pin press questions people actually ask
- Conclusion: why the pin press belongs in your program
In this guide, you’ll learn how to set up and execute a pin press workout that actually carries over to your full bench, while also building thicker triceps and a stronger, more confident press.
What is a pin press?
A pin press (often called a pin bench press or dead-stop bench) is a bench press variation performed in a power rack where the bar rests on safety pins at a set height. You press from a dead stop to lockout, pause, then return the bar to the pins under control.
Because you can choose the pin height, you can target specific zones of the press: off-the-chest power, mid-range strength, or triceps-dominant lockout work. This “range-specific overload” is why pin pressing is popular in powerlifting and strength training circles.
Why the pin press builds serious chest and triceps power
It develops true starting strength (no stretch reflex)
In a standard bench press, the bottom position benefits from elastic energy and the stretch reflex. With the bar starting on pins, you must generate force from zero. That’s why pin pressing feels brutally honest — and why it can expose and fix weak points.
It targets your exact sticking point
Most bench failures happen in predictable regions (near the chest, mid-range, or lockout). Pin height lets you train the exact segment that fails under heavy loads. If you consistently miss at lockout, the pin press can shift emphasis toward elbow extension and triceps contribution.
The upper-half range can light up the triceps
Research examining EMG across different bench press ranges found the upper-half range produced the highest mean triceps excitation, while partial ranges showed distinct activation patterns versus full ROM. That’s a big clue for why pin presses (often set mid-to-high) can be so effective for triceps-driven lockout strength.
It can be a shoulder-friendlier heavy press option (for some lifters)
Because you can avoid deep shoulder extension at the bottom, many lifters find pin pressing easier to tolerate than always going full ROM heavy. It’s still a loaded press, so good technique matters, but the ability to limit depth can reduce irritation for some athletes.
Pin press vs. bench press: what carries over
Pin press carries over best when you treat it as a supplement to full-range pressing, not a replacement.
What transfers well
- Stronger lockout and mid-range strength (especially if triceps are the limiter).
- Better control and tightness under heavier loads (because the rack setup is strict and repeatable).
- Confidence unracking and handling heavier weight in a partial range.
What transfers less
- “Off-the-chest” pop if you only ever set pins high. If your weakness is the first 2–3 inches off the chest, set pins lower and include paused full-ROM work elsewhere in your week.
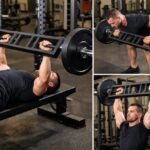
How to do a pin press with perfect form
Rack setup (this is where most people mess up)
Set the pins so the bar rests at the height you want to train. Then set the J-hooks so unracking is smooth and you don’t lose tightness.
A practical starting point:
- Mid-range focus: pins around where the bar would be a few inches above your chest.
- Lockout focus: pins higher, roughly in the top third of the press.
(You can refine after a few sessions once you identify your true sticking region.)
Step-by-step pin press cues
- Lie on the bench with eyes under the bar.
- Pull shoulder blades down and back; keep upper back “tall.”
- Feet planted; create full-body tension before unracking.
- Unrack and set the bar directly over your shoulder joint.
- Lower to the pins under control and settle the bar (don’t crash).
- Pause briefly on the pins, then press hard to lockout—think “push yourself away from the bar.”
- Lower back to the pins with the same bar path.
For general bench mechanics and joint positioning, the NSCA’s bench press teaching progressions are a solid reference point.
Best pin heights for chest vs triceps emphasis
Pin height is your “dial.” Use it intentionally:
Lower pins (closer to the chest)
You’ll usually feel more pec and shoulder involvement because the press starts in a more disadvantaged position. This can help if you fail early or struggle to stay tight near the bottom.
Mid pins (your typical sticking-point zone)
Great for strength carryover, because you’re training the exact region where bar speed dies.
High pins (top third / near lockout)
Often the most triceps-dominant setup. EMG work comparing ROMs supports the idea that the upper-half press heavily involves the triceps.
Pin press workout programming that actually works
Below are three proven ways to use the pin press depending on your goal. Pick one and run it for 4–8 weeks, then reassess.
Goal 1: Build lockout strength (powerlifting-style)
Use heavier loads in a controlled partial range.
- Pin press: 4–6 sets of 2–4 reps
- Rest 2–4 minutes
- Keep each rep crisp from the dead stop (no grinding into pins)
Pair with triceps volume that doesn’t wreck your elbows:
- Cable pressdowns or overhead extensions (moderate reps)
- Optional close-grip work if recovery is good
Lockout-focused training is widely used to address top-end failure where triceps contribution becomes limiting.
Goal 2: Add chest + triceps size without beating up joints
Use moderate loads, controlled eccentrics, and slightly higher reps.
- Pin press: 3–4 sets of 6–10 reps
- 2-second lower, dead stop, strong press
- Stop 1–2 reps shy of failure to keep technique clean
For broader chest and pressing hypertrophy principles, NASM’s bench press biomechanics overview also summarizes evidence that bench press training supports strength and hypertrophy outcomes.
Goal 3: Break a plateau with a “specificity sandwich”
This is a practical weekly structure many lifters tolerate well:
- Day A (Specific): Full ROM bench (paused or competition style)
- Day B (Targeted): Pin press at your sticking point
- Day C (Assistance): Dumbbell/incline + triceps accessories
This way, you keep the skill of full ROM bench while using the pin press as the problem-solver.
Common pin press mistakes
Mistake: Slamming the bar into the pins
Fix: Lower with control and let the bar settle. Treat the pins like a “pause,” not a bounce.
Mistake: Losing upper back tightness between reps
Fix: Reset your scapulae and breath before each press. Dead-stop reps punish sloppy setups.
Mistake: Setting pins too high, then calling it “bench strength”
Fix: If you only train the easiest third of the lift, you’ll only get strong there. Put the pins where you truly miss.
Mistake: Flaring elbows hard on the dead stop
Fix: Use your normal bench groove. Many lifters do best with a moderate tuck and a stable wrist-over-elbow stack.
Pin press variations to keep progress moving
Wide-grip pin press for more chest bias
A slightly wider grip can increase pec involvement for many lifters (at the cost of some shoulder stress). Use this if your goal is chest development and you tolerate wide pressing well.
Close-grip pin press for triceps overload
If your lockout is the issue, a closer grip can shift more demand to elbow extension and the triceps.
Isometric pin press holds (advanced)
Press into the pins as hard as possible for 5–8 seconds at your sticking point, then follow with normal pressing. This can be useful for force output practice and confidence under strain.
FAQ: pin press questions people actually ask
Does the pin press build chest?
Yes — especially when pins are set lower or mid-range and your technique keeps tension through the pecs. EMG research shows different ROMs change muscle excitation patterns, and partial ranges can meaningfully stress prime movers depending on setup and load.
Is pin press better than board press?
They’re similar “partial range” tools, but pin press starts from a dead stop (more starting strength demand), while board press still uses an eccentric and can retain some elastic rebound. If you want brutally honest power off a dead start, pin press is usually the cleaner choice.
How often should I do pin presses?
Most lifters do best with 1 session per week for 4–8 weeks, while keeping at least one full-ROM bench day for skill and shoulder health balance.
What’s a good pin press weight compared to my bench?
Many lifters can pin press more than their full bench when pins are high, but that number alone isn’t the point. Use load that allows perfect dead-stop reps and steady progression. If you want a simple reference: work in the 70–90% zone of your full bench depending on pin height and rep range, then adjust based on bar speed and form.
Conclusion: why the pin press belongs in your program
The pin press is one of the most practical “problem-solving” lifts for pressing strength because it strips the rep down to pure force production and lets you train the exact range where you fail. Set the pins to match your sticking point, stay disciplined with dead-stop control, and program it alongside full-ROM bench work — not instead of it.
Do that consistently for 4–8 weeks, and you’ll usually notice what matters most: a stronger lockout, thicker triceps, and a bench press that no longer stalls when it counts.