

If you’ve ever noticed your rim wobbling under brake pads or heard that annoying “tick-tick” from a loose spoke, you’ve already met the problem: wheel trueness. The big question is whether a wheel truing stand is actually worth buying, or if DIY methods (using your bike frame, zip ties, or makeshift gauges) can get you the same result.
- What “truing” a wheel really means
- Why DIY truing feels “good enough” (and when it is)
- Wheel truing stand: what you’re really paying for
- Wheel truing stand vs DIY: a practical comparison
- The “actually works best” verdict (based on outcomes, not vibes)
- DIY truing methods that are genuinely effective
- The hidden skill that matters more than the tool: tension discipline
- Cost vs value: when buying a wheel truing stand makes sense
- Common scenarios
- Practical tolerances: how true is “true enough”?
- FAQ
- Conclusion: wheel truing stand or DIY — what works best?
Here’s the honest answer: DIY truing can absolutely work for small corrections and emergency fixes, but a stand wins when accuracy, repeatability, and wheel health matter — especially for radial hops, dish, and tension balance. The “best” option depends on what kind of rider you are, how often you true wheels, and how perfect you need the final result to be.
Let’s break down what truly works, what’s hype, and how to choose the method that won’t leave your wheel worse than before.
What “truing” a wheel really means
Wheel truing is adjusting spoke tension so the rim runs straight and round. Most people focus on side-to-side wobble, but real truing includes multiple checks:
Lateral truing means reducing side-to-side runout (rim drifting left/right).
Radial truing means reducing up-and-down hop (rim moving closer/farther from the hub).
Dish (centering) means the rim sits centered between locknuts/dropouts so it tracks straight in the frame.
Park Tool’s repair guidance emphasizes that truing is fundamentally tension adjustment — spokes pull the rim into alignment, and good truing is controlled, incremental tension changes, not brute-force “bend it back.”
Why DIY truing feels “good enough” (and when it is)
DIY methods are popular because they’re fast, cheap, and surprisingly effective for minor lateral wobbles. The most common DIY approach is using your bike as the stand:
You flip the bike upside down or mount it in a repair stand.
You use brake pads, a zip tie, a marker, or a fixed pointer as a reference.
You tighten or loosen spokes to bring the rim away from the rub.
This works best when the wheel is only slightly out of true and you’re mostly correcting lateral runout. Sheldon Brown notes that a truing stand is nice, but wheels can be trued using the bicycle itself as a reference if you’re careful about consistent indicators.
The big limitation DIY methods can hide
DIY setups often “mask” problems because the reference points aren’t as stable or precise as you think:
Brake pads move, flex, and aren’t always aligned.
Frames/forks can be slightly misaligned, giving you a false “center.”
It’s harder to see radial hops and subtle deviations.
You can accidentally correct wobble by introducing uneven tension — so the wheel looks straight but becomes weaker over time.
That last point is the one that bites riders: you can produce a wheel that appears true but has tension imbalances that encourage spokes to loosen or fatigue faster under load. Wheel behavior under load is well studied in engineering literature; for example, work by Duke University’s H.P. Gavin discusses spoke strains and how wheels behave structurally under real riding forces.
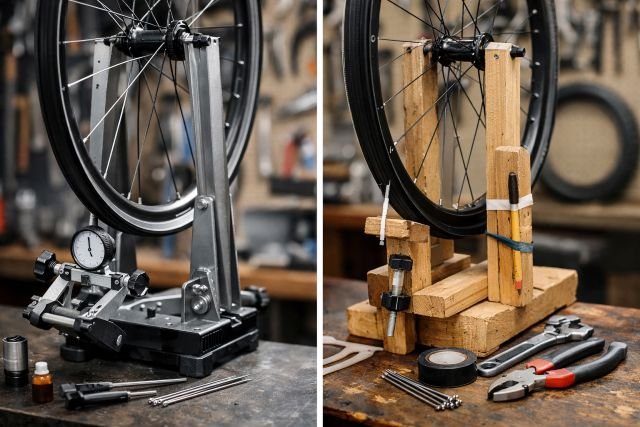
Wheel truing stand: what you’re really paying for
A wheel truing stand isn’t magic — it’s stability and measurement. It holds the wheel firmly, spins smoothly, and gives you fixed indicators that make small deviations obvious and repeatable. It also simplifies dishing checks and, in many stands, makes it easy to add a dial indicator or use consistent caliper placement.
Park Tool’s resources and manuals highlight that proper truing involves lateral and radial correction, plus dishing and stress-relief/tensioning procedures — tasks that get much easier in a dedicated stand environment.
Where a truing stand clearly wins
A truing stand is the better tool when you’re dealing with:
Radial hops (especially on alloy rims where hops are visible but tricky to correct).
Dish problems (wheel centered incorrectly, common after spoke replacements).
Major wobbles or post-impact damage.
Wheel building from scratch.
Repeat maintenance across multiple bikes/wheels.
A stand also removes variables like brake caliper alignment or frame flex, which DIY methods can inadvertently “bake into” your truing result.
Wheel truing stand vs DIY: a practical comparison
Here’s a quick reality-based comparison:
| Category | Wheel truing stand | DIY methods (bike frame/zip ties/etc.) |
|---|---|---|
| Lateral truing (small wobble) | Excellent | Good to very good |
| Radial truing (hop/roundness) | Excellent | Often frustrating/inaccurate |
| Dish accuracy | Good to excellent | Weak unless you add a dish tool/extra checks |
| Speed for repeat work | Fast | Slower (more trial-and-error) |
| Cost | Higher upfront | Minimal |
| Risk of “straight but unhealthy” tension | Lower | Higher if you chase rub without tension discipline |
The “actually works best” verdict (based on outcomes, not vibes)
For most riders, the best approach is not either/or — it’s staged:
DIY truing works best for quick lateral touch-ups and roadside saves.
A wheel truing stand works best for long-term wheel health, full truing (lateral + radial), and any wheel you care about.
If you only ever fix minor brake rub once or twice a year, DIY can be enough. But if you’re servicing multiple wheels, riding hard, or maintaining disc wheels where you don’t have brake pads as a built-in gauge, a stand stops being a luxury and starts being the tool that prevents repeat problems.
DIY truing methods that are genuinely effective
Let’s talk about DIY methods that aren’t just TikTok hacks.
1) Using the bike frame as a truing stand
This is the classic. You use the fork/rear triangle as a stable reference and create a pointer close to the rim.
A common “works in real life” trick is a zip tie on the fork/seat stay, trimmed so the tail almost touches the rim. Spin the wheel, listen/observe where it hits, then make spoke adjustments.
Sheldon Brown’s guidance supports using the bike as a reference when needed, with careful technique and correct spoke wrench sizing.
2) Using brake pads as an indicator (with caution)
Brake pads can work as a crude lateral gauge. The danger is that pad spacing and caliper centering can be off, especially on worn pads or flexy calipers. It’s a “get you home” solution, not a precision method.
3) Improvised stand (fork clamped / bench setup)
Some riders clamp an old fork in a vise and use it as a stand. This can work surprisingly well if it’s stable, but it still lacks easy dish checking and consistent radial gauges unless you add them.
The hidden skill that matters more than the tool: tension discipline
Whether you’re using a truing stand or DIY, the most common mistake is focusing on rim straightness while ignoring spoke tension balance.
Jobst Brandt’s work is widely regarded as foundational on wheel behavior and building methodology, and the broader wheelbuilding community consistently emphasizes even tension and proper stress relief as key to durable wheels.
If you only tighten spokes on one side to pull the rim over, you can “win” laterally but create a wheel that goes out of true again quickly.
If you want a measurable anchor for tension practices, manufacturers like DT Swiss publish manuals and support documentation (including truing stand and tensiometer documentation) that reflect how seriously brands treat correct tension ranges and measurement.
Cost vs value: when buying a wheel truing stand makes sense
A truing stand makes sense when at least one of these is true:
You true wheels more than a couple times per year.
You maintain multiple bikes (family, team, garage projects).
You ride hard (MTB, loaded touring, commuting potholes).
You want to learn wheelbuilding properly.
You run disc brakes and don’t have rim brake pads to “show” rub.
If you’re a casual rider doing rare touch-ups, DIY remains the best ROI.
Common scenarios
Scenario A: “My rim rubs slightly on rim brakes”
DIY is usually enough. Use a zip tie gauge and do tiny 1/8-turn nipple changes. Re-check often.
Scenario B: “I feel a hop or pulsing braking”
This is radial. A truing stand is strongly preferred, because radial deviations are harder to see accurately on the bike. Park Tool specifically separates lateral and radial truing concepts for a reason—radial correction is its own thing.
Scenario C: “I replaced a spoke and now the wheel feels ‘off’”
Dish and tension balance are now in play. A stand (plus a dish check) is the safer path.
Scenario D: “My wheel is pretty bent after an impact”
A stand helps you diagnose if the rim is salvageable. If you can’t achieve true/round/dish with reasonable and even tension, the rim may be done — something even spoke-tension guides point out as a practical decision point.
Practical tolerances: how true is “true enough”?
Perfection is not always necessary, but the wheel must be safe and stable. Some guidance sources discuss typical runout ranges depending on wheel quality and use (for example, tighter expectations for higher-end wheels, looser for entry-level).
The smarter rule is this: if you can true it visually but the wheel repeatedly drifts out of true, you likely have tension imbalance, fatigue, or rim damage — not a “truing technique” problem.
FAQ
What is a wheel truing stand?
A wheel truing stand is a tool that holds a bicycle wheel securely and provides fixed reference points so you can adjust spoke tension to make the rim straight, round, and centered.
Can I true a wheel without a wheel truing stand?
Yes. You can true a wheel using the bike frame, brake pads, or a zip tie as a reference indicator, especially for minor lateral wobbles.
Is DIY truing as accurate as using a stand?
For small lateral corrections, DIY can be close. For radial hops, dishing accuracy, and repeatable precision, a wheel truing stand is typically more accurate and easier to use consistently.
What’s the biggest mistake people make when truing wheels?
They chase straightness while ignoring spoke tension balance. That can create a wheel that looks true but loosens spokes, drifts out of true quickly, or fails sooner. Manufacturer documentation and wheelbuilding theory consistently emphasize correct tension practices.
Do I need a truing stand if I have disc brakes?
You don’t need one, but it helps a lot because disc setups don’t give you brake pads near the rim as a built-in visual gauge. A stand makes the process more straightforward and repeatable.
Conclusion: wheel truing stand or DIY — what works best?
If you want the simplest, most reliable path to straight, round, properly centered wheels, a wheel truing stand is the clear winner — especially for radial hops, dish accuracy, and consistent results across multiple wheels. But DIY methods absolutely work when the issue is minor, the goal is “no rub,” and you’re disciplined about small adjustments and tension balance.
The real deciding factor isn’t just budget — it’s frequency and standards. If you’re truing often or you care about long-term wheel durability, a stand pays you back in fewer repeat fixes, fewer broken spokes, and less guesswork. If you only need occasional touch-ups, DIY gets you 80% of the way there with almost no cost — as long as you respect the physics and don’t overtighten your way into the next problem.