
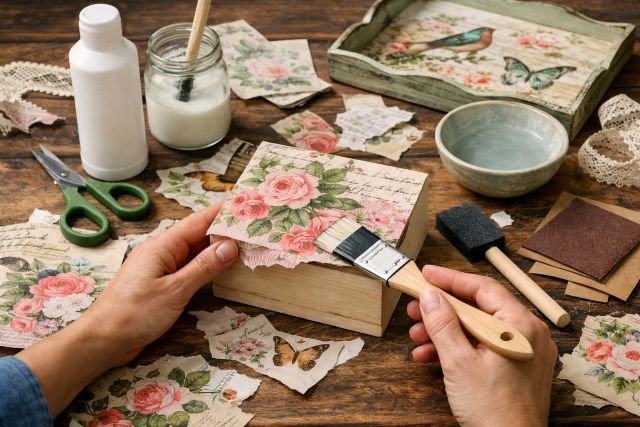
Decoupage with paper looks deceptively simple: cut, glue, seal, done. But if you’ve ever dealt with bubbles, cloudy topcoats, torn napkins, or edges that lift after a week, you already know there’s a “hidden skill” behind the results you see on Pinterest and in craft fairs.
- What is decoupage with paper?
- The real secret starts with paper choice
- Supplies that actually change your results
- Decoupage with paper, step by step, for a smooth finish
- The secret tricks crafters keep using
- Real-world scenarios you can replicate
- FAQ: decoupage with paper questions people ask most
- Conclusion
In this guide, you’ll learn the practical tricks experienced makers rely on to get a smooth, durable finish that looks painted on. You’ll also learn how to pick the right paper, how to prep different surfaces, how to seal so the design lasts, and how to troubleshoot the most common problems. Along the way, you’ll see real-world scenarios and quick FAQ-style answers designed to match how people search.
The crafting economy is massive, and the skills you build can translate into projects you gift, keep, or sell. In the U.S., arts and cultural economic activity was measured at $1.17 trillion in 2023, and it grew 6.6% (inflation-adjusted) from 2022 to 2023.
What is decoupage with paper?
Decoupage is the art of decorating an object by gluing paper cutouts to a surface and sealing them with layers of protective finish until the paper looks integrated rather than pasted on. Traditional decoupage often involved many varnish layers, sometimes sanded between coats, to create a deep and durable surface.
Modern decoupage with paper is faster because we have better adhesives and sealers. You can still achieve that “printed onto the surface” look, but you do it with cleaner tools and smarter layering rather than endless coats.
The real secret starts with paper choice
Most decoupage problems begin before glue touches anything. Paper expands, wrinkles, absorbs moisture, or resists adhesion depending on its weight, coating, and ink type. When crafters say “this paper just works,” they’re talking about paper behavior.
Scrapbook paper is beginner-friendly because it’s sturdy and predictable. Decorative napkins are popular because they’re thin enough to blend beautifully, but they tear easily and wrinkle if you overwork them. Tissue paper can wrap curves nicely, yet it shifts if you don’t control moisture. Rice paper and specialty decoupage papers are designed to smooth well and resist tearing. Magazine pages and home prints can look amazing, but they can also bleed or resist glue because of coatings and ink chemistry, so they require testing first.
If your project is meant to last, paper chemistry matters too. The Library of Congress explains that permanent paper standards include pH requirements and other criteria that slow yellowing and breakdown. In plain terms, acid-free, higher-quality papers usually age better, especially on light-colored projects that you want to stay bright.
Supplies that actually change your results
You can decoupage with basic glue and a clear coat, but dedicated decoupage mediums are designed to bond paper and dry into a clear film that also seals the surface. Mod Podge is one of the most common examples of a purpose-made decoupage medium used across surfaces.
Safety matters too, especially if you craft in small spaces or with kids nearby. ACMI’s AP and CL seals are used to indicate that art materials have been evaluated by a qualified toxicologist and labeled appropriately for hazards. If you’re sensitive to fumes, choosing water-based, appropriately labeled products is a smart baseline.
Decoupage with paper, step by step, for a smooth finish
A professional-looking decoupage finish comes from process discipline, not force. Beginners tend to brush glue on, stick paper down, then brush more glue aggressively until it looks “flat.” That creates wrinkles because paper swells when wet and tears when overworked.
Start by prepping the surface. Clean it thoroughly, especially glass and metal. If you’re working with glossy paint or finished wood, lightly sanding helps adhesion. If your surface is dark and your paper is light, paint a light base coat so the design doesn’t look dull.
Next, cut your pieces and dry-fit them. This one step prevents the most common mistake: repositioning wet paper. Once paper is wet, it stretches. Once it stretches, it wrinkles when it dries.
Apply a thin, even coat of decoupage medium to the surface rather than soaking the paper. Place the paper gently, then smooth from the center outward with minimal passes. The secret is fewer strokes, not more.
Let the layer dry fully, then seal with a thin coat on top. Repeat with additional thin coats until the paper looks visually integrated. If you want a “painted on” look, the goal is to build enough clear film above the paper that the edge disappears.
The secret tricks crafters keep using
Wrinkles are mostly moisture management and friction control. Paper expands when it absorbs water, and every brush stroke adds both water and mechanical drag. The trick is to use less medium than you think, smooth once, and stop touching it until it dries.
Edge lifting happens because edges are stress points. They get bumped, scrubbed, and exposed to humidity first. After your paper is down and dry, give the perimeter extra sealing attention. Multiple thin coats along the edges, followed by full drying, dramatically reduces lifting over time.
Ink bleeding and smearing is another silent project killer. Many crafters learn this the hard way with magazine images or home prints. Some inks can be water-soluble, and some coated papers resist adhesion. Art suppliers recommend testing because inks may run depending on the print and medium. You can reduce risk by using more stable print types, sealing the paper lightly before gluing, or choosing decoupage-specific paper when the surface is unforgiving like glass.
Napkin decoupage looks magical when done well, but it’s easy to destroy. The trick is gentleness and patience. Separate the printed layer, place it dry, and apply medium softly from the center out. If you push hard or keep brushing, you’ll shred it.
If you want a glass-smooth finish, layering is the trick. Traditional decoupage often used repeated varnish coats to create depth. Today, you can recreate that with modern sealers by building thin coats, letting them dry thoroughly, and refining the surface gradually rather than trying to achieve perfection in one pass.
For functional items, curing time is the secret most people skip. A finish can feel dry long before it has fully cured. For example, Plaid’s guidance for dishwasher-safe decoupage includes a 28-day cure before gentle top-rack washing. Even if you’re not making dishware, the principle holds: durability improves when you respect cure time.
Real-world scenarios you can replicate
Imagine you find a scratched wooden tray at a thrift store and want it to look boutique. The approach that works is simple: sand lightly, apply a light base coat if needed, use a single large sheet of paper to minimize seams, then seal edges carefully and build thin finish coats. The project looks “manufactured” because the design reads as part of the surface, not layered on top.
Now imagine a glass jar that you want to look expensive without worrying about scratches. Reverse decoupage is ideal because the design sits behind the glass, protected from wear. The paper is applied on the inside and viewed from the outside, then backed with paint to make colors pop. This method hides brush marks and keeps the design safe in daily handling.
For furniture accents, the difference between “DIY” and “designer” is edge blending. Thin paper, multiple sealing coats, and patience create a transition where the edge becomes hard to see. When the edge disappears, the whole project looks intentional.
FAQ: decoupage with paper questions people ask most
How do you decoupage with paper without bubbles?
Use a thin, even layer of medium, place the paper once, then smooth from the center outward with minimal strokes. Bubbles are usually caused by thick glue or repeated repositioning while wet.
What paper is best for beginners?
Scrapbook paper is a strong starting point because it is sturdy enough to handle smoothing and sealing without tearing, while still blending nicely after a few coats.
Do you put decoupage glue on top of the paper?
Yes. After the paper adheres and dries, you seal over it with thin coats to protect the design and create a smooth integrated finish.
Can you decoupage on glass?
Yes. Clean the glass well, use a medium designed for multi-surface adhesion, and consider reverse decoupage for a cleaner look and better durability.
Why is my decoupage cloudy?
Cloudiness usually comes from coats that are too thick, moisture trapped between layers, or insufficient dry time. Thin coats and full drying between layers typically solve it.
Conclusion
Decoupage with paper stops being frustrating when you treat it like a finishing technique instead of a glue-and-go craft. The tricks that experienced crafters won’t stop using are mostly about control: controlling moisture so paper doesn’t swell, controlling friction so it doesn’t tear, and controlling wear points so edges don’t lift.
Choose a paper that behaves well, prep your surface so adhesion is strong, apply thin coats with minimal handling, seal in layers, and give your project time to cure. When you do, the result doesn’t look like paper on top of a surface. It looks like the surface was made that way.