

If you’re moving house or shipping an appliance, the washing machine box you choose (and how you pack it) can be the difference between a smooth delivery and an expensive surprise. Washers are heavy, awkward, and packed with parts that don’t like shocks, drops, vibration, or leftover water.
- What is a washing machine box?
- Why washers get damaged during moving or shipping
- 1) Choose the right washing machine box (strength beats “fits”)
- 2) Drain, dry, and deodorize before boxing (water is the silent killer)
- 3) Immobilize the drum with transit bolts (when applicable)
- 4) Protect corners and edges inside the washing machine box
- 5) Eliminate empty space with firm, non-crushing cushioning
- 6) Strap and stabilize the box like it’s freight (because it is)
- 7) Label for handling — and pack for the reality that labels get ignored
- FAQs (optimized for featured snippets)
- Conclusion: a washing machine box is only as good as the packing method
The tricky part is that “damage” doesn’t always show up as a giant dent. A washer can arrive looking fine but develop issues later because the drum wasn’t secured, hoses leaked internally, or the cabinet took a corner impact. That’s why professional movers obsess over the unglamorous details: bracing, immobilizing, cushioning, and controlling moisture.
What is a washing machine box?
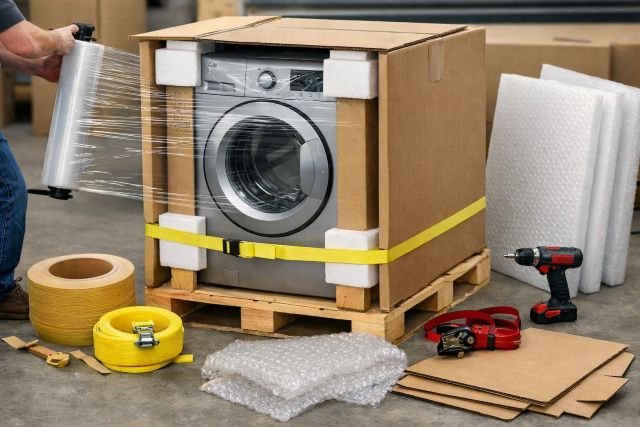
A washing machine box is a heavy-duty corrugated carton (often double-wall) sized for washers, designed to reduce transit damage by providing structure and space for protective padding. It’s typically used with corner protectors, foam blocks, and straps so the washer can survive common shipping hazards like drops, vibration, compression from stacking, and punctures.
Packaging standards like those from the International Safe Transit Association (ISTA) exist specifically because distribution environments are rough: shock events (drops/impacts) and continuous vibration are common hazards for large, heavy products.
Why washers get damaged during moving or shipping
Washers fail in transit for a few predictable reasons:
Shock and corner drops. A short drop onto a corner can twist the cabinet frame, crack plastic components, or damage mounts. Shock events are a known transportation hazard, which is why packaging tests include drop/impact simulation.
Vibration and rubbing. Long rides in a truck create sustained vibration that can loosen fasteners, wear edges, and grind packaging against the cabinet if there’s empty space.
Internal movement (front-loaders especially). The drum is suspended to move during washing, which is great for laundry and terrible for transport unless it’s immobilized with transit/shipping bolts when applicable.
Claims are common enough that logistics firms track them. Some industry sources estimate up to about 1% of parcels end up lost or damaged annually, which is why prevention is cheaper than repairs. (Large appliances shipped via LTL freight can face even rougher handling than standard parcels.)
7 pro packing tips for a washing machine box (damage-proof method)
1) Choose the right washing machine box (strength beats “fits”)
A washer needs a box that does two jobs at once: hold shape under compression and leave room for protective materials. If the carton bows, the cabinet becomes the “structure,” and that’s when dents happen.
Look for double-wall corrugate or manufacturer-style cartons rated for heavy appliances. If you’re buying retail moving supplies, use an appliance-specific washer/dryer box rather than piecing together standard moving boxes. Even many moving brands emphasize using the right method and materials for washer/dryer moves because of weight and handling risks.
Pro insight: A box that’s slightly oversized is fine only if you fill the space with firm, non-crushing protection (foam blocks/corner posts). Oversized + empty space = momentum + cabinet damage.
2) Drain, dry, and deodorize before boxing (water is the silent killer)
A washing machine box won’t save you from moisture. A tablespoon of trapped water can leak during a tilt, soak cardboard, and weaken the carton exactly when you need it strongest.
Use a moving guide approach: disconnect, drain hoses completely, and let the washer dry out with the door open. U-Haul’s washer/dryer moving tips emphasize safe prep steps before transport.
Real-world scenario: A top-loader is boxed perfectly, but the drain hose still holds water. During the ride, the box gets damp at the base, softens, and the carton crushes slightly when strapped in the truck. The washer arrives with a wrinkled side panel and a musty smell that takes weeks to clear.
Pro move: After draining, run a towel through the door gasket and detergent drawer area (front-loaders) and tape a small “DO NOT CLOSE DOOR” note until it’s fully dry — then close and secure.
3) Immobilize the drum with transit bolts (when applicable)
If you have a front-load washer, drum immobilization is one of the most important steps. Many front-loaders ship with transit (shipping) bolts that lock the drum to prevent internal damage during transportation. Retailer/manufacturer support docs explain that transit bolts prevent the drum (which normally moves freely) from damaging the washer in transit.
LG even publishes guidance showing how to remove transit bolts, and notes re-tightening them for transport (the idea being: secure the drum before moving).
What if you don’t have the original transit bolts?
Check your manual or brand support. If you can’t source the right bolts, your risk rises because the drum can swing and stress the suspension during bumps.
Pro insight: This is the step that separates “looks fine on delivery” from “starts knocking two weeks later.”
4) Protect corners and edges inside the washing machine box
Corners take the most abuse. That’s why packaging standards and test procedures often focus on edge and corner impacts.
Inside your washing machine box, use rigid corner protectors (foam corner posts, heavy molded corners, or dense honeycomb corner pieces). Place them so the cabinet corners never touch the carton wall directly.
Why it works: Corner posts turn a point impact into a distributed load across a larger area of cardboard and foam. It’s the difference between a dent and a shrug.
Pro move: Add edge guards along the top rim if you’re also strapping the box—straps can crush cardboard into sharp edges that imprint the cabinet.
5) Eliminate empty space with firm, non-crushing cushioning
A washer doesn’t need “soft” packing. It needs firm blocking so it can’t build momentum inside the box.
Use dense foam blocks, rigid pads, or formed inserts. Avoid loose-fill peanuts for this application; heavy items settle and create voids, which leads to internal shifting. If you must use padding sheets, layer them thickly and compress them so they behave like a brace, not a pillow.
Vibration reality: Transport vibration is constant, and if the washer can rub even slightly, it will. Over long distances, small movement becomes wear.
Quick test: With the washer boxed (before sealing), push the cabinet from the outside. If you feel it “slide” or thump, you need more blocking.
6) Strap and stabilize the box like it’s freight (because it is)
A sealed washing machine box is still vulnerable if it tips, slides, or gets top-loaded in a truck.
Use two straps minimum (perpendicular directions if possible) and place a rigid sheet (like corrugated pad or a strap guard) under the strap path so tension doesn’t crush carton edges.
If you’re loading into a container or pod, appliance positioning matters too. U-Haul’s U-Box packing advice recommends centering appliances and being thoughtful about how heavy items are placed.
7) Label for handling — and pack for the reality that labels get ignored
Yes, label the carton “THIS SIDE UP” and “HEAVY.” But pack assuming it may still be tilted, bumped, and briefly set down hard.
This is the mindset behind transit testing: packaging is designed around hazards, not hopes. ISTA’s test procedures exist to simulate the distribution environment and validate protective packaging performance.
What to do anyway:
- Mark the center of gravity (helps movers).
- Add “DO NOT STACK” if you’re shipping freight (carriers may still stack, but it can influence handling).
- Photograph the washer from all sides before boxing and after sealing. If delivery damage happens, you’ll have documentation.
FAQs (optimized for featured snippets)
Do I really need a washing machine box to move a washer?
If you’re transporting it more than a short, careful move across a flat surface, yes. A washing machine box adds structure, allows room for corner protection, and reduces cabinet dents from impacts that happen during loading and transport. Packaging hazards like shock and vibration are common in transit, and a proper carton is designed to manage them.
Can I lay a washing machine on its side in the box?
It’s safer to keep washers upright whenever possible because tipping can stress internal components and increase the chance of residual water leaking where you don’t want it. If you must tilt temporarily for handling, pack assuming tilts can happen and focus on drum immobilization and leak prevention. (Follow your manufacturer guidance if available.)
What are transit bolts, and why do they matter?
Transit bolts (shipping bolts) secure the drum on many front-load washers so it doesn’t swing during transport. Support documentation explains they prevent the moving drum from damaging the washer during transit.
How do I prevent dents on the washer corners during moving?
Use rigid corner protectors inside the washing machine box and eliminate all empty space so the washer cannot shift. Corner impacts are a common transit hazard, and corner protection is one of the highest-ROI upgrades you can add.
What should I do if my washer arrives damaged?
Photograph the carton and the washer immediately, keep all packaging materials, and report damage to the carrier/retailer as soon as possible. (Many retailers advise documenting damage right at delivery.)
Conclusion: a washing machine box is only as good as the packing method
A washing machine box is the foundation, but the protection comes from what you do next: drain and dry thoroughly, immobilize the drum (especially for front-loaders), brace corners, block empty space, and stabilize the load so it can’t tip or slide. Transit is harsh — drops and vibration are normal, not rare — which is exactly why packaging standards and test procedures exist.
If you follow these seven tips, you dramatically reduce the odds of dents, leaks, and hidden internal damage — and you’ll unpack your washer ready to work, not ready for repairs.